プランナーボード
Statusbrewのプランナーボードでよりデータベース化されたソーシャルメディア投稿の計画、予約、管理を行いましょう。
Statusbrewのコンテンツ管理 プランナーボードの特徴
ソーシャルメディアのコンテンツ管理は、単なるカレンダー表示だけでは捉えきれない複雑性を持っています。Statusbrewのプランナーボードは、シンプルかつ、従来の決まったソーシャルメディアカレンダーではなく、自分の好み通りの投稿管理をビジュアル化することに優れています。
同じデータをさまざまな形式で表示することで、好みや役割に応じたコンテンツ管理設計のインターフェイスを自由自在に組み立てることができます。例えば、マネージャーは月間表示で全体計画を確認し、クリエイターはリスト表示で自分の担当タスクに集中するといった使い方が可能です。
「マーケティングチーム用ボード」 「承認者用ボード」など、目的別に複数のボードを作成可能です。
各ボードで異なるフィルターやビュー設定を保存できます。
プランナーボードの作成方法
Statusbrewでプランナーボードを作成するには:
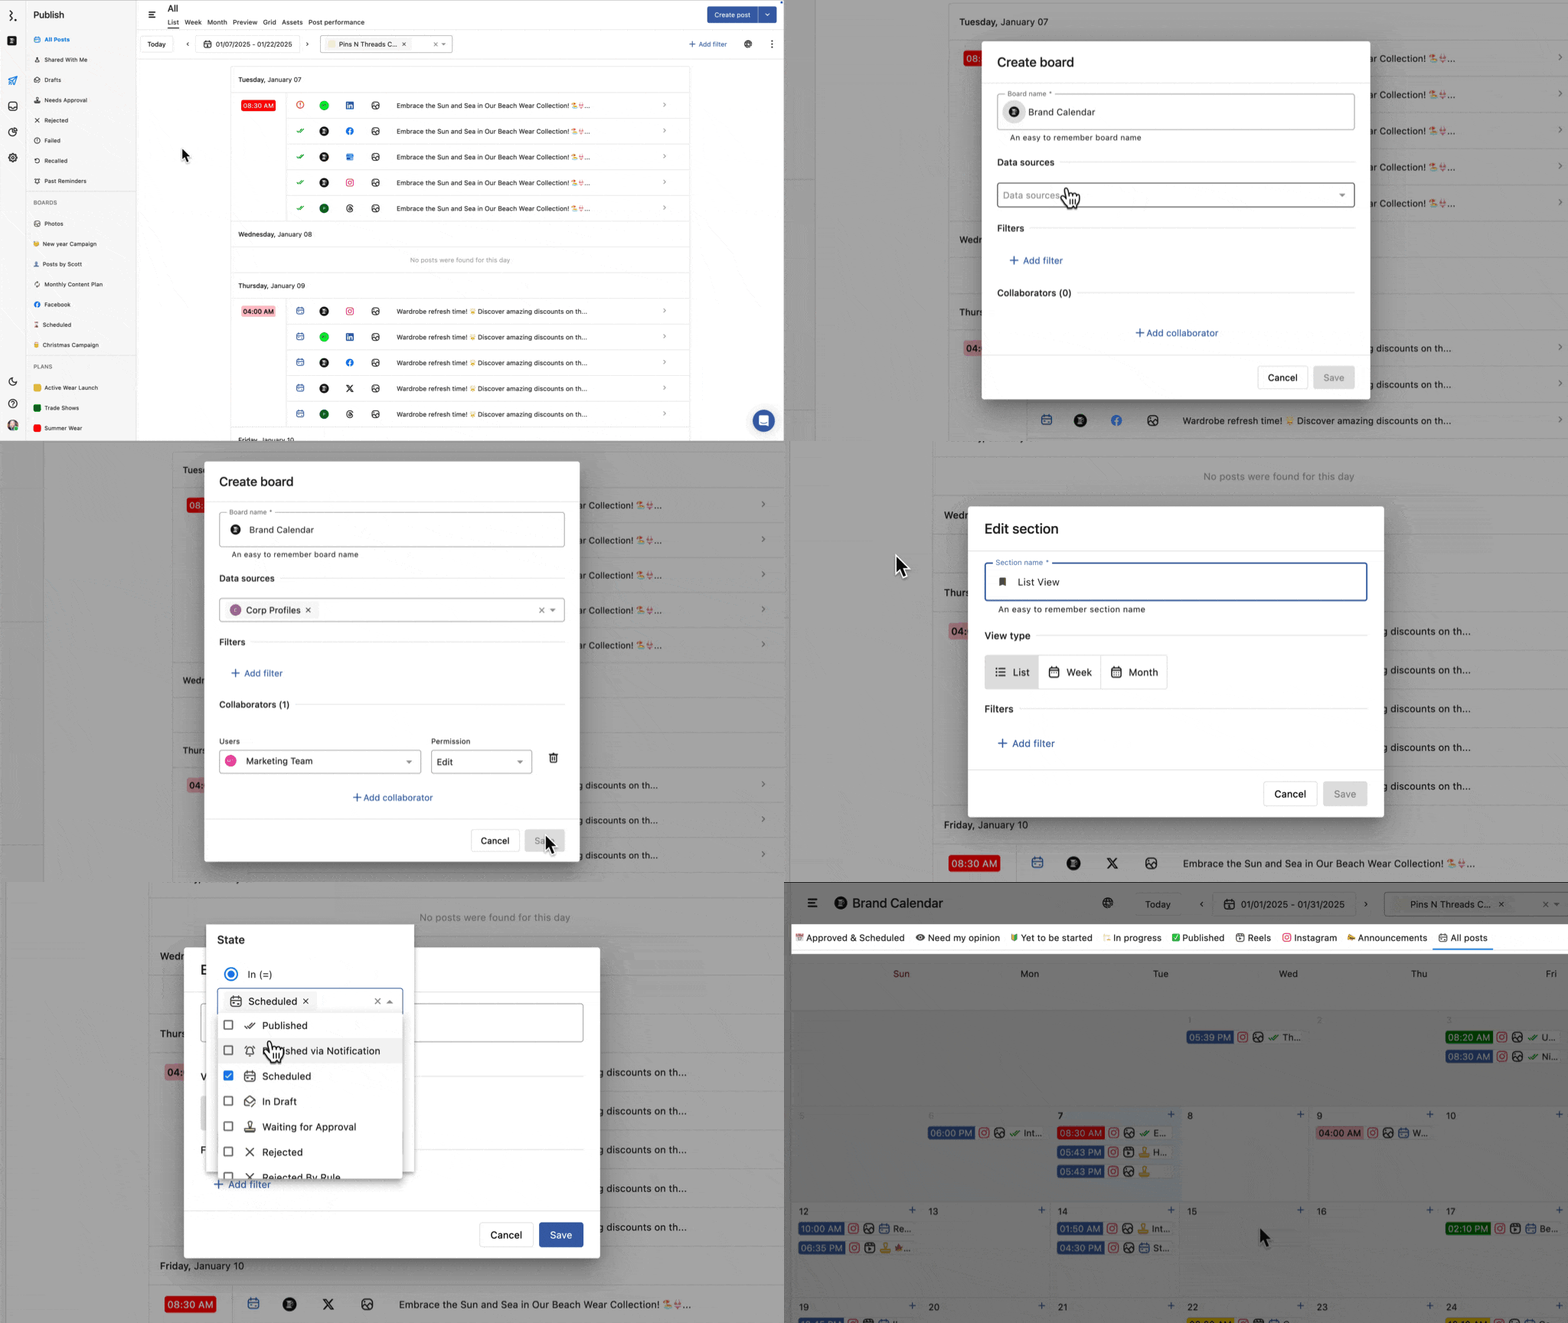
ダッシュボードから、プランナーにアクセスします。
左手のナビゲーションメニューから、Boardsの右にあるをクリックします。
ボード作成のダイアログから、ボード名を入力し、データソースを選択します。
作成済みのフォルダーがある場合には、格納先フォルダーを選択します。
フィルターやコラボレーターを追加します。コラボレーターとは、このボードを共有する相手で、編集/閲覧権限とともに追加します。
保存ボタンをクリックして完了です。
プランナーボードをフォルダーで管理する
プランナーボードが増えるとサイドバーが雑然として、目的のボードにすぐにアクセスできなくなってしまいます。そんな時は、フォルダーを作ってボードを分類しましょう。
サイドバー上部のパブリッシュの右にあるをクリックすると、フォルダー作成のダイアログボックスが表示されます。
フォルダー名を入力し、保存をクリックします。
作成したフォルダーがサイドバーに表示されるので、ドラッグ&ドロップでボードを格納します。
をクリックするとフォルダー内の受信トレイを表示、 で非表示にします。
フォルダー名の右側の三点メニューをクリックし、編集、削除が可能です。
詳細はこちら
プランナーボードを編集/削除する
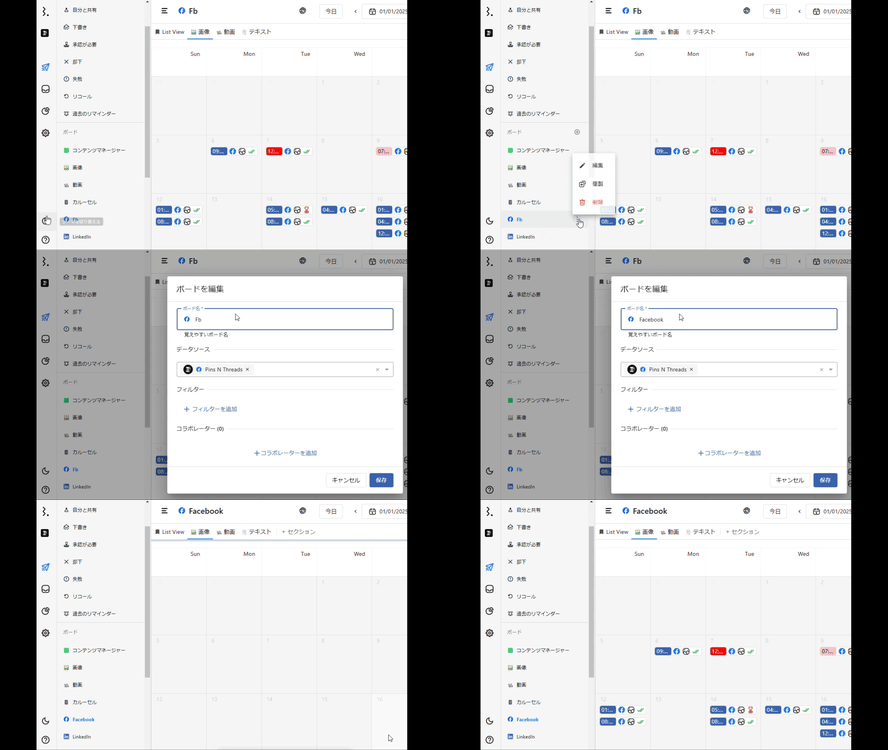
作成したプランナーボードは、左手のナビゲーションメニューの「ボード」に表示されます。ボード名をクリックすると、そのボードに切り替わります。ボードは、編集、複製、削除することも可能です。
編集するときは、ボード名の右にある三つの点 をクリックします。編集、複製、削除と3つのオプションが表示され、編集を選ぶと下記の内容を編集することができます。
ボード名:名前を変更、またはアップデート
データソース:ボードに取り込みたいデータソースを追加、または不要なソースを削除
フィルター: フィルターを追加、削除、またはアップデート
コラボレーター:ユーザーの追加または削除や、権限を設定
管理者(Admin)以上のユーザーは、アクセス権限の付与に関係なく、すべてのプランナーボードを閲覧することが可能です。
編集が完了したら、「保存」ボタンをクリックします。
ボードのフィルター
ボードには様々なフィルターを追加することができます。プランナーボードを使いこなすためには、このフィルタリング設定がとても重要です!ユーザーの立場やタスクが違えば、最適なボードは異なります。承認者であればステータスを確認しやすいボードが良いでしょうし、スケジュールに沿って着実に動画制作したいクリエーターには余計な情報は不要かもしれません。
データをどの角度で取り入れ、いかに自分用にカスタマイズするか。そのために、Statusbrewでは下記のフィルターをご用意しました。ここでは、基本的なフィルタリングについてご説明します。
プロファイル:特定のソーシャルプロファイルからデータを取得する/しない、あるいは、接続されているどのプロファイルからデータを取得する/しない、を選択
ネットワーク:特定のソーシャルネットワークからデータを取得する/しない、あるいは、接続されているどのソーシャルネットワークからデータを取得する/しない、を選択
(上記2つは、データの取得範囲を指定するためのフィルターです)
実行者:アクティビティを実行したチームメンバーが誰であるのかに基づくフィルタリング
投稿種類: 投稿種類に基づくフィルタリング
ステータス:投稿のステータス(送信、予約済み、承認待ち等)に基づくフィルタリング
プラン:コンテンツのプランに基づくフィルタリング
承認:承認者に基づくフィルタリング
Shared With Me:あなたに共有された投稿に基づくフィルタリング
タグ:特定のタグがついているコンテンツに基づくフィルタリング
その他(コンテンツ作成時のカスタムフィールドに基づくフィルタリング):Statusbrewでは、コンテンツの作成時、キャンペーン、ターゲットオーディエンス等を設定したり、コメントを追加することが可能です。プランナーボードでフィルタリングする際も、これらの情報に基づいて、対象範囲を絞ることができます。
プランナーボードのセクションとは?
プランナーボードでは、各ボードの中身を更に細かく分類することができます。例えば、週間と月間、どちらのカレンダービューも表示したり、Facebookのコンテンツを画像や動画など種類ごとに分類したり。Statusbrewでは、ボードの中をさらに分類することを「セクションの作成」と呼んでいます。プランナー(エディトリアルカレンダー)をカスタマイズしたボード、そのボードをさらにカスタマイズしたもの、それが「セクション」です。
セクションの作成方法
初めてボードを作成した段階では、月間/週間/リスト/プレビューの4つのセクションが自動で作成されます。
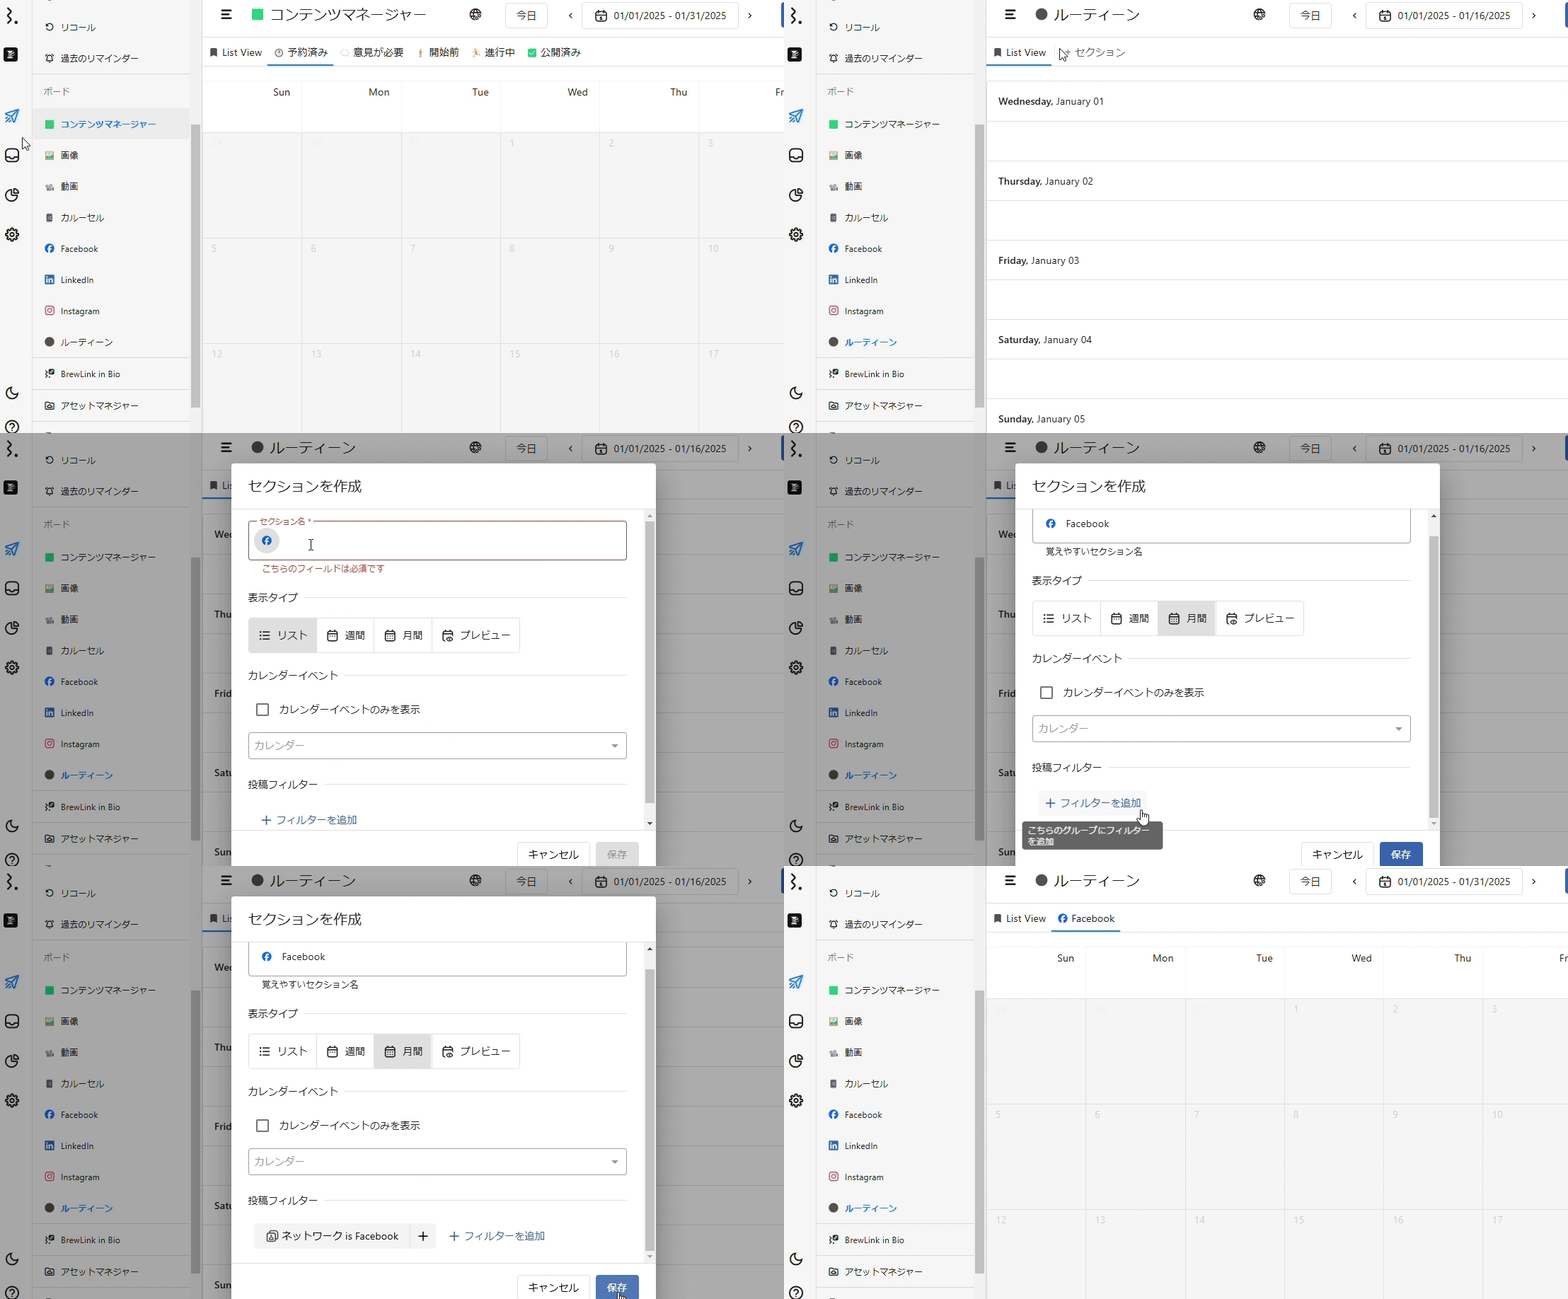
セクションタブの右端にカーソルを合わせると、「+セクションを作成」というオプションが表示されるので、これをクリックします。
セクションの作成画面が表示されるので下記を入力します。 ・セクション名 ・表示タイプを選択:月間/週間/リスト/プレビュー/(Instagramのみ)グリッド/承認 ・セクションタイプ:投稿/イベント/投稿とイベント(イベント、投稿とイベントを選択した場合はカレンダーも選択) ・フィルターの追加
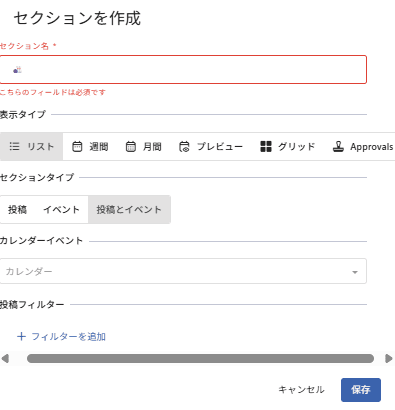
入力が完了したら、右下の「保存」をクリックします。
セクションタブの一番右に新しいセクションが表示されます。
セクションの編集方法
セクションはドラッグして左右に移動させると、場所を入れ替えることができます。また、各セクションのタブをクリックすると下記のオプションが表示されまます。
セクションを編集:セクション名やカレンダービューの表示タイプ、フィルターを編集
セクションを複製:同じセクションを複製
セクションを削除:ボードからそのセクションを削除
外部とのボードの共有方法
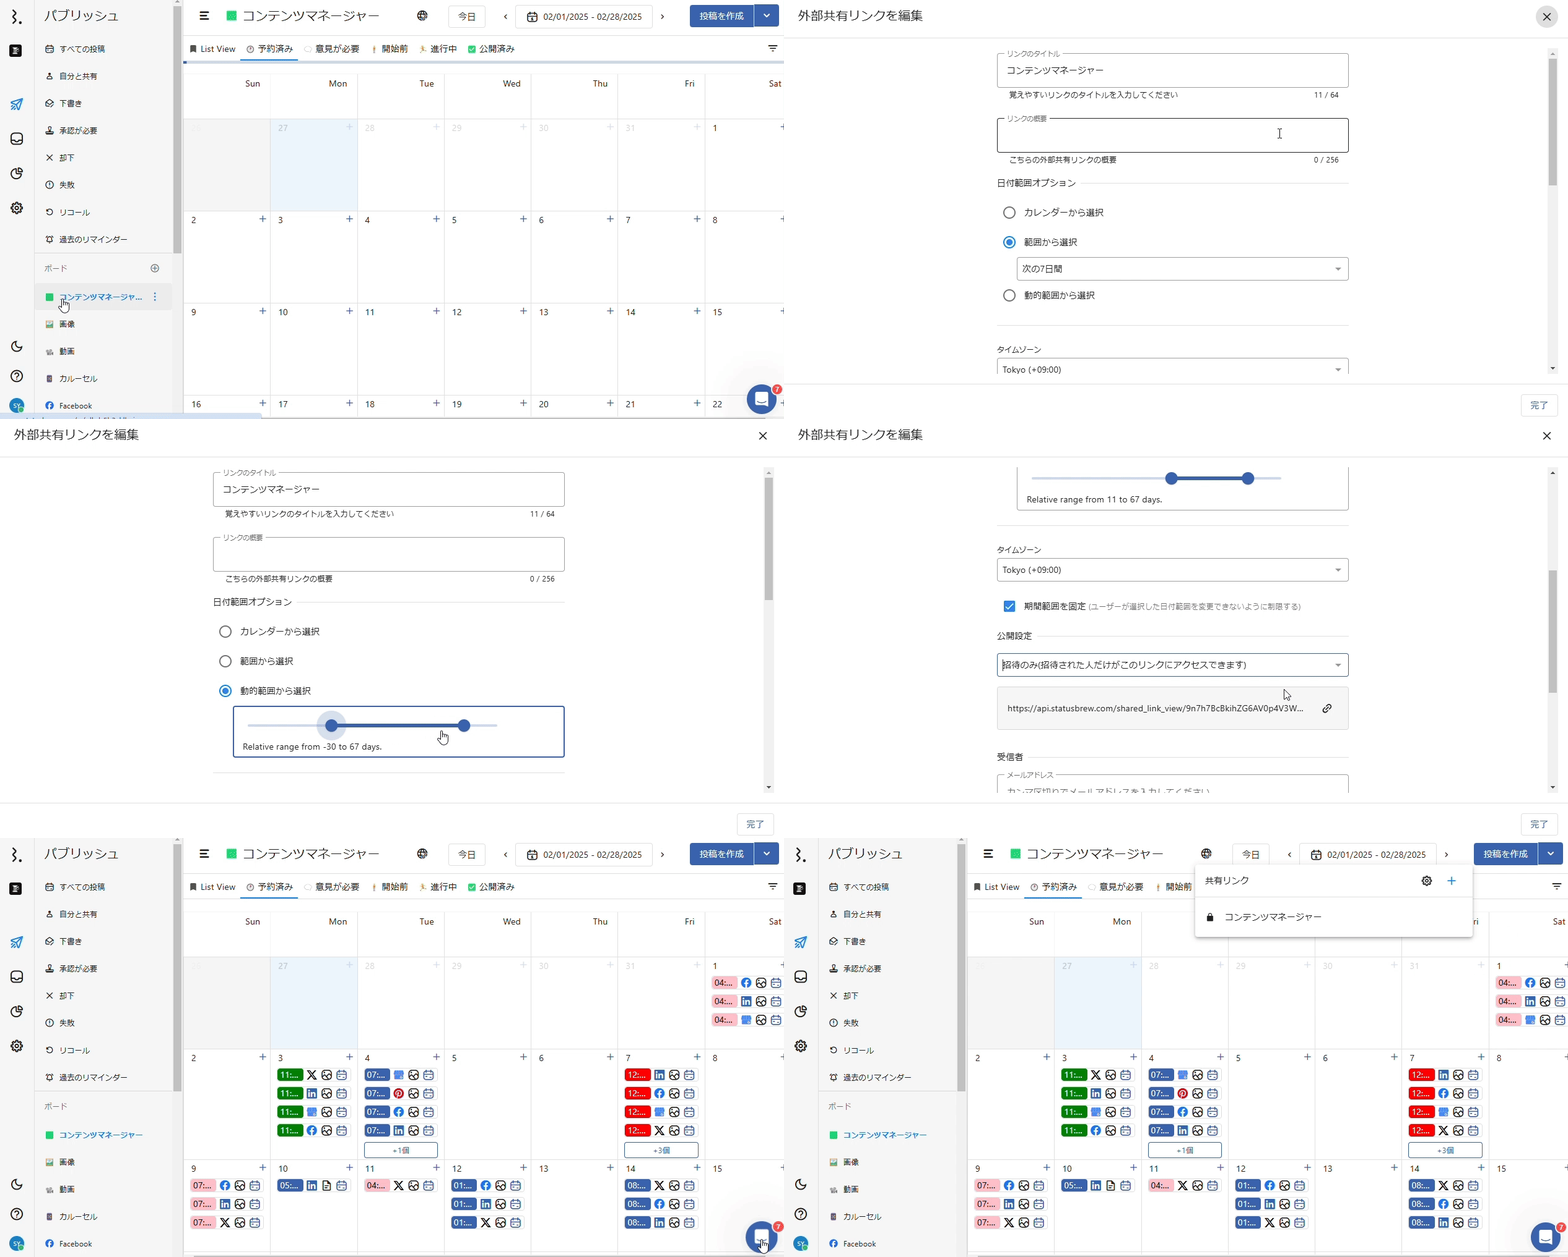
リンクを共有することで、外部と簡単にボードを共有することも可能です。
プランナーから、目的のボードへアクセスします。
画面上部にあるリンクを共有 をクリックし 、「+外部共有リンクを作成」をクリックします。
リンクをクリックすると共有リンクがコピーさせるので、適宜共有します。
共有リンクの編集/削除
リンクを共有 をクリックし、右手に表示されるその他オプション をクリックすると、リンクを編集または削除するオプションが表示されます。
削除: 共有リンクを削除
編集: 次のことが編集可能
リンクのタイトル:カレンダーに関連するタイトルを追加
リンクの概要:内容を伝える概要を入力(256字以内)
日付範囲オプション:カレンダーに表示させたいデータの日付範囲を、次の3つから選択できます。
カレンダーから選択:カレンダーから開始日と終了日を選択
範囲から選択:あらかじめ設定された範囲(例:過去7日間、先週、先月、来月)から選択
動的範囲から選択:マウスを操作して、範囲を選択します
タイムゾーン:カレンダーを見る人に合わせてタイムゾーンを設定できます
期間範囲を固定:ユーザーが選択した日付を変更できないように制限します
公開設定:下記2つから、公開設定のオプションを選択できます
招待のみ:招待された人だけが、リンクにアクセス可能
全体に公開:リンクを知っている人なら誰でもアクセス可能
リンク:リンクをコピーして必要な相手と共有できます
受信者:リンクを共有したい相手のメールアドレスを入力(複数の場合は、カンマで区切ってください)
メッセージ(任意):招待者へのメッセージがあれば入力
リンクの有効期限:データのプライバシー及び関連性維持のため、リンクの有効期限を設定する場合は、トグルボタンをオンにして、日付を選択します
編集が完了したら、「完了ボタン」をクリックして、内容を保存します
プランナボードの基本的な活用例
プランナーボードは、単なるエディトリアルカレンダーではありません。データに様々なフィルターをカスタマイズすることで、投稿のスケジュール管理はもちろん、承認ワークフローの管理、コンテンツの分類、チーム編成や、別チームあるいは外部関係者との情報共有など、フレキシブルなコンテンツプランニングツールです。
各ボードに様々なセクションを作ることで、異なるカレンダービューやコンテンツに簡単アクセスできます。ここではプランナーボードの基本的な活用例をいくつか考えてみました。
ネットワークベース:FacebookやInstagramなど、ソーシャルメディアのネットワークごとに分類したボードを作成し、各ネットワークごとにコンテンツを管理します。また、各ボードの中に、承認者やセクションの種類ごとにセクションを追加することで、それぞれの状況を細かく管理・運用することができます。
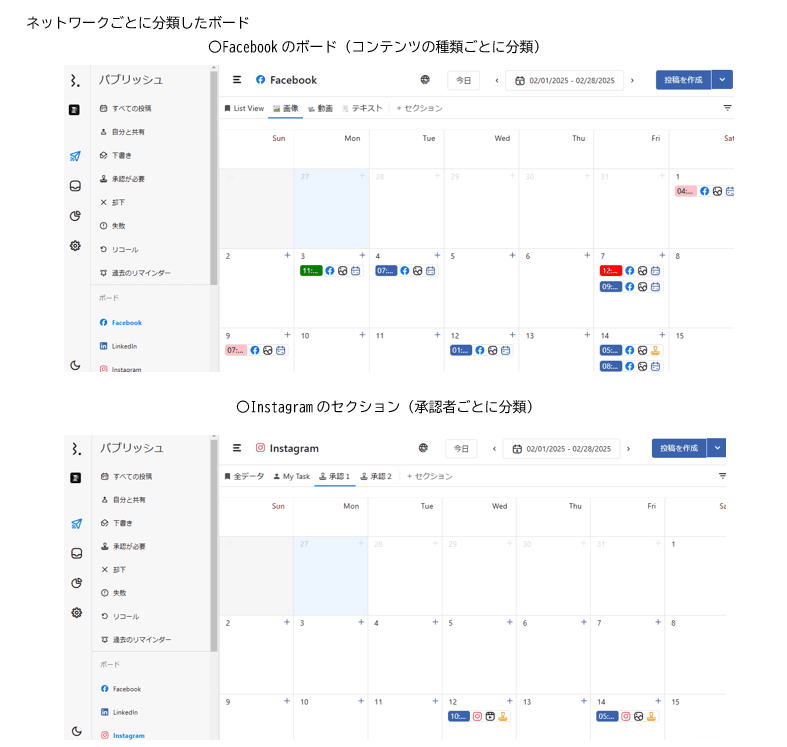
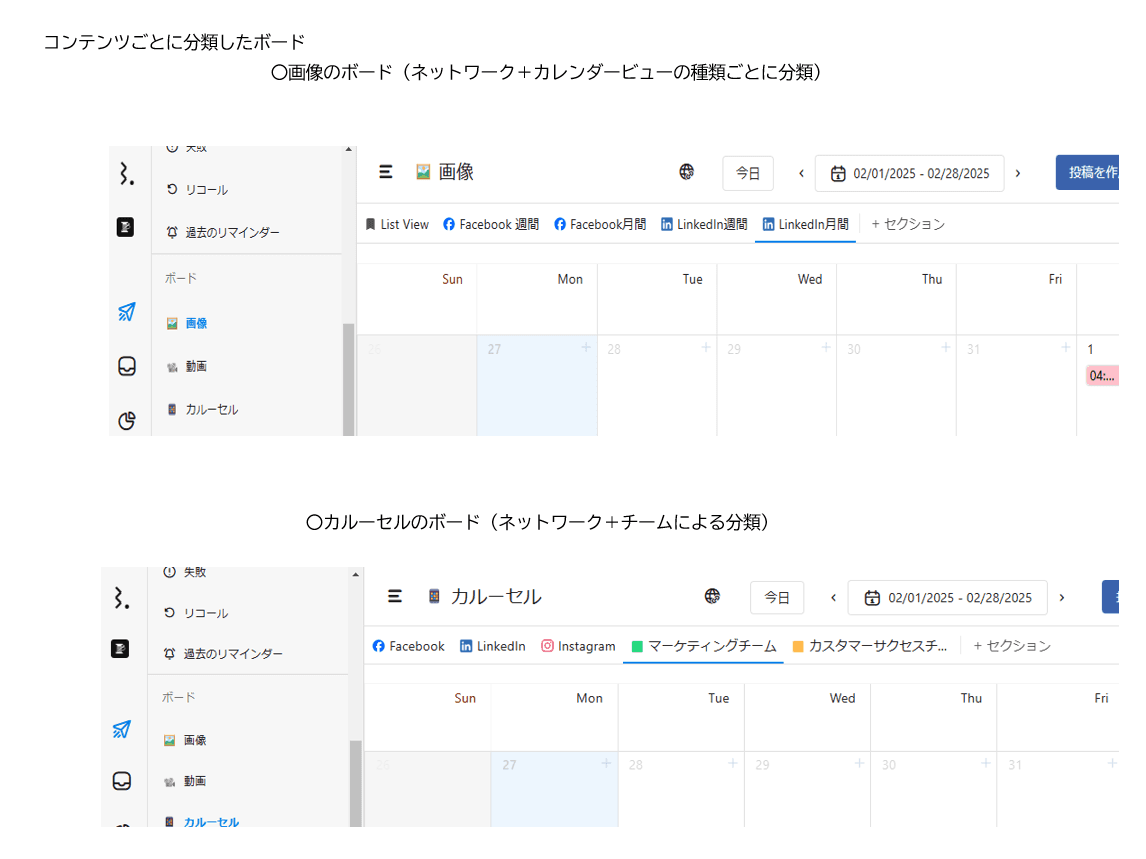
コンテンツベース:画像、動画、ストーリー、カルーセルなど、コンテンツの種類ごとに分類したボードです。コンテンツ作成に便利なボードです。
例えば、コンテンツの種類をボード名にします(例:画像)
ボード作成時のフィルターで、投稿種類を「In(=)」 で「画像」を選択
目的のデータソースとコラボレーターを選択し、保存をクリック
その後、各ボードに、Facebook 、LinkedInとネットワークごとのセクションを作ったり、マーケティング、セールスチームが実行者であるデータを絞り込むセクションを追加します
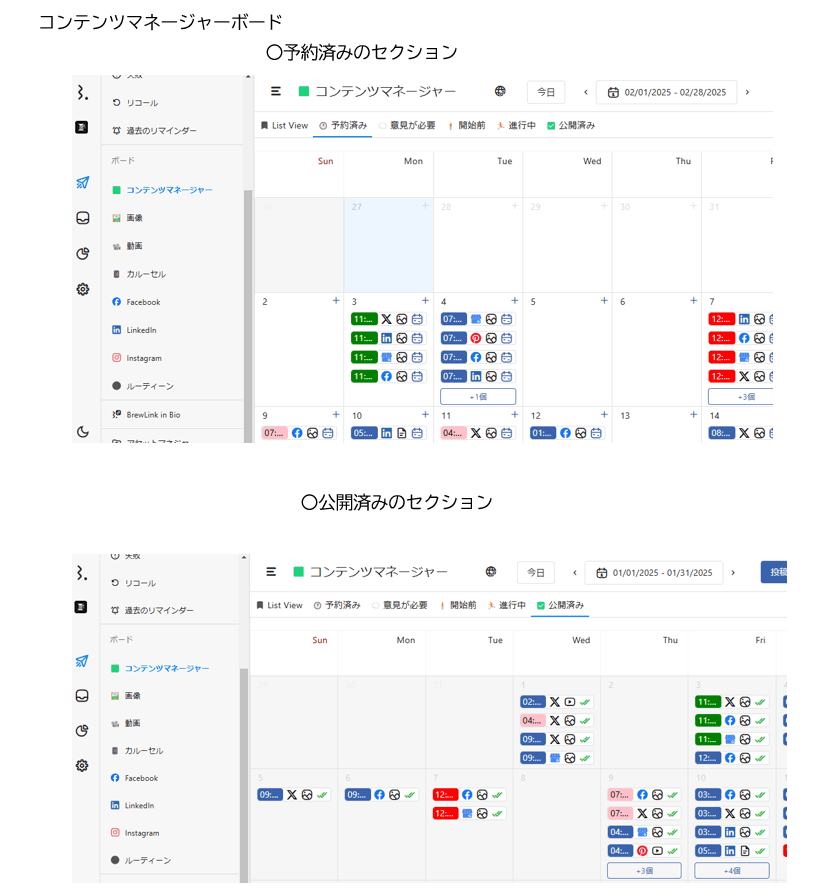
コンテンツマネージャーボード:コンテンツカレンダーをステータスごとに分類した、 進行状況の管理に特化したボードです。下記のようにセクションを作成します。
予約済み投稿:フィルターを、ステータスを選択し、「In(=)」にチェックし、「予約済み」を選択します。
意見が必要:フィルターで、Shared WIth Meを選択して、「Is(=) 」、「True」のトグルボタンをオンにします。あなたに共有されているすべての投稿が表示されます。意見を求められているコンテンツがないかチェックしましょう。
開始前:フィルターで、プランを選択し、「In(=)」にチェックし、該当するプラン名を選択します。関連する今後のプランが表示されます。
進行中:フィルターで、ステータスを選択。「In(=)」をチェックし、「下書き」と「承認待ち」を選択します。これによって、現在進行中のコンテンツが表示されます。
公開済み:フィルターで、ステータスを選択。「In(=)」をチェックし、「送信」を選択します。すでに公開済みのすべての投稿が表示されます。
上記はプランナーボードの基本的な活用方法です。よりクリエイティブにカスタマイズして、オリジナルのプランナーボードを作成してください!
Statusbrewでは、今後もプランナーボートのベストプラクティスを順次更新していきます。